Showing posts with label kids craft. Show all posts

Tuesday, October 28, 2008

Lego Party Ideas

A few weeks ago my 7 year old wanted to have a Lego Party with some of his friends.  Here is what we did (just cutting and pasting the rest of this post from my own blog):

The Lego Party was a huge hit. Mark had a great time and all his friends seemed to also. I had tons of fun putting it together and was really happy with how it all turned out. And let's be honest, I'd much rather plan a party than clean house, pay bills, etc. So, it really was a great week. Although my bathrooms, floor and laundry may complain of neglect.

Here was the invitation Mark and I put together and delivered:

And here are some pics from the party:

(click to enlarge)

Each picture above is numbered and a coordinating number is below with a description/explaination:

1. We decorated in traditional Lego colors with balloons streamers, and different colored plates, cups, forks, etc.

2. One of the games we played I printed off of Lego.com, it had two similar pictures and the kids had to find and circle the 15 differences between the two pics. The winner got to pic a lego person keychain/bag charm as their prize.

3. For another contest we had everyone build anything they wanted to out of legos. We had spaceships, Star Wars ships, a house, and other things that I had no idea what they were, but everyone loved what they made and loved playing with all their creations together after this game. For this game everyone got a bag of Lego Brick candy that I got at the bulk candy store in the mall for a prize.

4. Here are the Lego Brick Candy prizes. We had one for the most colorful creation, one for the fastest looking one, one for the person that used the most people, etc.

5. These were the prizes for the other games. They are Lego figure keychains that the boys like to hook on their backpack zippers. I took Mark to the Lego store at the mall and he picked them out so of course they are all Star Wars.

6. These are the gift bags I put together for the boys. I found the idea online and just bought bags and coordinating cardstock and then used a craft punch to punch the circles out of the cardstock and then attached them with pop dots to the bags. Inside the bag was a lego poster again a download from Lego.com that I had printed on 8x10 photo paper at Fred Meyer, and a set of lego stickers (from Lego.com) that I printed on sticker paper from the office supply store.

7. The first game we did as the boys arrived was to have them guess how many Legos were in this jar. They all guessed super low, and I would have too if I didn't know how many were in there. Can you believe there are 300? 

8. We had a tallest tower contest to see who could build the tallest tower in 2 minutes and it couldn't fall over. 

9. I used the bags as place cards at the table so that boys who knew each other would have a friend to sit by (some of the kids were from church and some from school so they didn't all know each other before hand)

10. I found the basic idea for these Lego cakes online from Betty Crocker and thought they turned out great. I'm not a cake decorator by any means so they definitely aren't perfect, but the boys thought they were great!

The time actually flew by and the boys were totally content to just build and play with their Lego creations. I had to pry them away to eat the cake before their parents came to pick them up.

submitted by Emily (www.delightfuldistraction.blogspot.com)

Friday, March 28, 2008

EASTER BUNNY S'MORES


INGREDIENTS AND DIRECTIONS:

1. Reduce 1 sleeve graham crackers to crumbs.
2. Layer 2/3 of the crumbs in a 1 quart jar.
3. Place 8 marshmallow bunny peeps standing up, facing out around the inside of the jar.
4. Press them up against the glass, but don't squash them.
5. Carefully spoon remaining crumbs in the center of the jar to support the bunnies, pressing down to keep it snug.
6. On top of this pour 1-1/4 cup Easter M&M's.
7. Spoon 1/3 cup brown sugar into center of M&M's, gently pressing with a spoon.
My changes: I did M&M's first, then Peeps, then put combined brown sugar and graham cracker crumbs in baggie. I didn't like how the crumbs made a mess in the jar.

Attach a gift tag giving the following instructions:

1. Empty the jar contents into a bowl. Snip the bunnies into bits with kitchen sheers or cut up with a knife. Return the bunny bits to the mixture. Mix well.
2. Melt 1/2 cup butter; add 1 teaspoon vanilla. Pour this over the dry ingredients, mixing well. Pat into a greased 9" square pan. Bake at 350 degrees F for 15 minutes. Cool and cut into bars.
(Makes 9 to 12 bars.)

*Option - leave bunnies whole; combine remaining ingredients and place the bunnies on top; then bake as directed.

*This gift jar may be created to suit any holiday for which marshmallow candies are available.

submitted by Hilary Shirley

Kid Friendly Sushi


Supply list

Rice Krispies
Marshmallows
Butter
Swedish Fish
Fruit roll ups

I made these sushi for my kids to celebrate the Chinese New Year!

1. make rice krispy treats if you don’t have a recipie here is an easy one:
¼ c. butter
10 oz. marshmallows
6 c. Rice Krispies

Melt the butter and marshmallows over low heat on the stove. Pull off heat and add rice krispies. Place in buttered pan.

2. While the Rice Krispies are still warm, butter your hands and take a little ball out. Place a Swedish fish in the middle of the ball and form it into a sushi roll size. Wrap with a fruit roll up. Place on a plate to cool off.

Tips- you need to be able to rebutter your hands a lot so they don’t stick to the rice krispie treats. Also I cut the fruit roll ups in half. You might even want to cut it in thirds, it depends on how big you want your sushi to be. Have fun!


Submitted by Erin Wayland
http://nathananderinwayland.blogspot.com/

Thursday, January 31, 2008

Cute Anytime Gift Idea


Supplies needed:
2 colors of cardstock (Valentine's is coming . . . think pink!)
cellophane
coordinating ribbon
and . . .
Chocolates!

To make these little cuties . . . borrow your friend's scallop cutter to get the cute edge on the smaller circle. (Or you can probably buy that fun cutter at your local craft store.) Then I used the Creative Memories cutting systems circle patterns to cut the larger circles. I used a bit of 2-sided adhesive to stick them together. Finally, I used the CM circle maker to do the smaller circles for the coordinating gift tags, and a corner rounder to finish them off.

I've had my eye on these chocolates for two years now . . . they are from Costco and I think they are so cute! One box was $10.-12. I think, and dividing them up for these gifts had enough for the women I visit teach and for the elderly couples and widows in our cul-de-sac. (And of course a few left over for me to sample.)

These are nice because they are a small but delicious gift for a single person to enjoy.

submitted by
Alisha 

Tuesday, November 13, 2007

Pilgrim Hats


I found a cute idea on the Family Fun Website. Tonight for Family Home evening we talked about Giving Thanks and for our treats we made these cute Marshmallow Pilgrim Hats. The kids had a great time and they even taste pretty good. I also thought this would be a fun Visiting Teaching Family Treat. All you need is: Shortbread striped cookies, milk chocolate chips, large marshmallows, and a tube of yellow decorators frosting.

The gift bags for my visiting teaching ladies turned out great! I even created a great tag with the instructions on Photoshop! Happy Thanksgiving to Everyone!!

submitted by Emily H.(www.holversonfamily.blogspot.com)

Thursday, November 8, 2007

More Online Tutorials


this blog: http://adventureswiththeprovosts.blogspot.com/ is also doing 30 Days of Homemade Gift Ideas. They're intermingled with her regular blog posts... but she has some links to fun tutorials!! And they're not all sewing! (phew!) I like sewing but I'm not as talented as Little Miss Shelly! ;o)

submitted by Hilary

Tuesday, November 6, 2007

Nativity Blocks


This is a fun idea for nieces, nephews and even your own kids. I saw this on a message board and asked the girl if I could share.

Paint blocks with a few coats of paint. Then apply the stickers. Ink or sand the edges to distress. Then put a coat of Mod Podge on them to seal in the stickers. Let dry.

This particular set of stickers is by Me & My Big Ideas (MAMBI). They are no longer made, so if you like this set you just have to hope a craft or scrapbook store still carries this line. I've done extensive searches online and they are hard to find! However, there are other brands of Nativity stickers. You could probably even find cute nativity clipart.

submitted by Hilary

Halloween Treat "Hand" bags


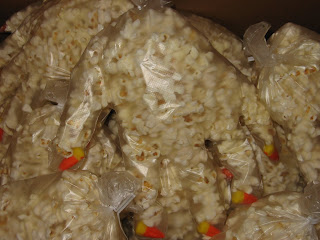
Ok, I know Halloween is over, but this was such a hit at my daughter's Kindergarten class party, that I had to pass it along.
I got the idea from Family Fun's website, which has the best ideas! Anyway, it is super easy and fun!

Here is what you need:
clear, plastic food handlers gloves (I found mine at the Dollar Store)
Candy Corn
Popcorn
Twist ties

Take the candy corn and put one in the finger of each glove. Then fill up each glove with the cooled popcorn, and really stuff it in there.
Then twist the hand closed with your twist tie. You are done! The kids loved them and they are sort of spooky too! I will warn you, that it
took me about an hour to fill about 15 bags, the popcorn was kind of hard to stuff into the fingers.

Submitted by Liz Brown (www.brownsarebloggin.blogspot.com)

Saturday, November 3, 2007

Halloween Bears


Saw this on Hilary's blog and thought it was cute. What a fun party favor for a kids party or fun for a class party.

I think DeMarle makes a Teddy Bear mold like this?

Friday, November 2, 2007

Snowmen Donuts


I thought this would be a cute neighbor gift or FHE treat. They just make me smile! Idea found on web somewhere...

submitted by Hilary

Thursday, November 1, 2007

Halloween Treat Baskets


A kind lady in our ward always has a little something special for my kids on the Sunday before Halloween. This was her sweet treat this year. I thought it would make a great party favor so I took pics to remember the idea. The baskets are made out of black cardstock. The rectangular boxes are just little match boxes covered in paper. Then inside there is a little candy bar. The round treats have a mint sandwiched in between the paper circles and they all fit nicely in the cute little basket. I'm guessing the stamps came from Stampin Up.

submitted by Emily (www.delightfuldistraction.blogspot.com)

Wednesday, October 24, 2007

Girlfriends Christmas Party


You may want to get a glass of water, this is a long one!

Last year I decided that instead of doing individual gifts for close friends I would have a Dinner Party instead. It was so much fun to plan and attend. My friend Alisha is always up for a party and helped out a ton. This idea could easily be adapted to a couples dinner party, you could do a progressive dinner with neighbors if you are close with several of them, or you could just use some of the little ideas of things we did at the party.

First I made these invitations.


I combined a place card and favor into one as shown below.


We had a couple different appetizers as guests were arriving and then for our meal we had Christmas salad, Cornish Game Hens with Wild Rice Stuffing, Homemade Rolls, and a fruit salad. For dessert we had Hot Chocolate and a delicious cake that Alisha made.


After dinner we painted picture frames and then added the word "JOY" to them with vinyl lettering. I got the frames from Micheals for $1 and the vinyl lettering online from www.iasign.com. Just a little holiday decoration they could take home to remember their evening.


Then we had a dessert gift exchange. Each girl brought a favorite holiday dessert in a nice serving dish to give away (serving piece included). We did the exchange white elephant style so you could steal back and forth to try and get what you wanted.


Adrianne's tray of chocolates from Harry & David and Chocolate Mousse Cups


I made English Trifle


Alisha made a cranberry pear tart


Kelly made a chocolate peppermint trifle


All in all it was a great night with friends, food, and visiting. This years is already in the works!

submitted by Emily(delighfuldistraction.blogspot.com)

Friday, October 19, 2007

Christmas Countdown


I made this last year when I had to come up with a quick extra craft for our
Super Saturday craft day at church. It's a little chalkboard countdown to
Christmas. It would be a fun gift for someone before Christmas so they
could use it during December.

It's just a 12x12 artist canvas (it cost around $5). I painted it black
with craft paint. You need to use several coats because the canvas really
absorbs the paint. Then I glued a scalloped edge piece of Bazzill cardstock
on top of that, and then topped that with the red holly patterned paper.

I printed off "Days Until Christmas" on my computer, and mounted that on
green cardstock. I put pewter brads through the corners of the cardstock,
before I attached it to the canvas. It would be very hard to get those tiny
brads through all that paper and the canvas.

I punched a hole in each upper corner of a square of chipboard, and then
used several coats (you must use several coats) of chalkboard spray paint to
turn it into a little chalkboard. I put a large decorative brad (this one
was through the canvas) in to make a picture hanger type effect, and then
put ribbon through the holes of the little chalkboard. I did attach the
chalkboard to the canvas with adhesive, though, because it would not stay
without that. So, it just looks like it's hanging there.

As an added touch, I stapled a loop of ribbon to the top for a chalk holder.
You can staple it to the wooden frame on the back of the canvas.

My kids loved erasing and writing in the new number each day as we counted
down toward Christmas.

You could hang it on the wall, but I don't have much wall space, so I put it
in a decorative plate holder and keep it on a table.

Submitted by Kelly (www.thisterthaster.typepad.com)

Altered Photo Tiles


Here is an idea, not mine originally, but it is super cute and inexpensive. Simply purchase some tiles, any size, color and texture you'd like; pick up some Mod Podge, and some clear glaze. Choose some pictures from your stash or have a few of your favorites printed up. Crop the photo to the size you think would look best on the tile. Play around first before you start mod podging! I put some rubons on the picture. You could also put some on the tile before you start mod podging. You can also use some things from your scrapbooking stash, such as rubons, stickers, or cardstock to back the photo with.

These are the directions:
1. Clean and dry the tile. Decide how you want the photos placed on the tile, and put any rub ons or stickers on before starting Step 2.
2. Dip your paint brush (the sponge kind works well) in the Mod Podge, and brush on tile gently but quickly, working from center out in long strokes. You can keep strokes all in the same direction or not, depending on the look you want. Once tile is well coated move on to step 3.
3. Get your photo and put a small amount of mod podge on the back, especially the edges.
4. Place the photo where you want it on the tile, gently pressing down, especially the edges. Let it sit for at least 30 minutes.
5. After 30 minutes, get more mod podge on the brush, working from center of photo outward again, covering the entire photo and tile. Once it is well covered, you can decide to make it a clean look or a cross hatch look, or gently go over with a sponge for a textured look. Then using a toothpick, pop any little bubbles that you see, and go back over that area to clean it up.
6. Let tile dry for at least 24 hours
7. Repeat steps 5 and 6.
8.Go outdoors or in a well ventilated area and spray the tile evenly with the gloss.
9. Let dry at least 24-48 hours.

These are the supplies:
Mod Podge matte (I found mine at Michaels)
Triple Thick Clear Glaze (Crafts Etc!) or any clear glaze you can find (I found mine at Michaels)
tiles (I got mine at Lowe's or Home Depot for under a $1 depending on size)
sponge paint brush (Michaels)
Small easel to stand the tile on (I purchased mine at AC Moore, but I am sure you can find them in any frame department.)

I believe the entire cost of one tile was $5 or less depending on the kind of tile you purchase and the kind of easel you buy!

Submitted by Liz
(www.brownsarebloggin.blogspot.com)

Thursday, October 18, 2007

Mayflower Kid Craft


Let’s just clarify – this is a kid craft! But, my daughter brought it home from first grade last year, and I thought it was so cute. It’s the Mayflower!

Supplies:

1 (clean) half gallon milk carton (cardboard kind, not the plastic bottle kind)
2 apples
2 skewers
Brown paper for covering the milk carton
White paper to make sails
Tissue Paper

Cut off one side of the milk carton (see photo to make sure you cut the right side). Cover outside with brown paper. Cut four sails from white paper. Poke the skewer through them. Put one skewer in each apple. Put the apples in the carton, and cover with tissue paper to hide the apples.

submitted by Kelly(www.thisterthaster.typepad.com)