Tuesday, October 28, 2008

Lego Party Ideas

A few weeks ago my 7 year old wanted to have a Lego Party with some of his friends.  Here is what we did (just cutting and pasting the rest of this post from my own blog):

The Lego Party was a huge hit. Mark had a great time and all his friends seemed to also. I had tons of fun putting it together and was really happy with how it all turned out. And let's be honest, I'd much rather plan a party than clean house, pay bills, etc. So, it really was a great week. Although my bathrooms, floor and laundry may complain of neglect.

Here was the invitation Mark and I put together and delivered:

And here are some pics from the party:

(click to enlarge)

Each picture above is numbered and a coordinating number is below with a description/explaination:

1. We decorated in traditional Lego colors with balloons streamers, and different colored plates, cups, forks, etc.

2. One of the games we played I printed off of Lego.com, it had two similar pictures and the kids had to find and circle the 15 differences between the two pics. The winner got to pic a lego person keychain/bag charm as their prize.

3. For another contest we had everyone build anything they wanted to out of legos. We had spaceships, Star Wars ships, a house, and other things that I had no idea what they were, but everyone loved what they made and loved playing with all their creations together after this game. For this game everyone got a bag of Lego Brick candy that I got at the bulk candy store in the mall for a prize.

4. Here are the Lego Brick Candy prizes. We had one for the most colorful creation, one for the fastest looking one, one for the person that used the most people, etc.

5. These were the prizes for the other games. They are Lego figure keychains that the boys like to hook on their backpack zippers. I took Mark to the Lego store at the mall and he picked them out so of course they are all Star Wars.

6. These are the gift bags I put together for the boys. I found the idea online and just bought bags and coordinating cardstock and then used a craft punch to punch the circles out of the cardstock and then attached them with pop dots to the bags. Inside the bag was a lego poster again a download from Lego.com that I had printed on 8x10 photo paper at Fred Meyer, and a set of lego stickers (from Lego.com) that I printed on sticker paper from the office supply store.

7. The first game we did as the boys arrived was to have them guess how many Legos were in this jar. They all guessed super low, and I would have too if I didn't know how many were in there. Can you believe there are 300? 

8. We had a tallest tower contest to see who could build the tallest tower in 2 minutes and it couldn't fall over. 

9. I used the bags as place cards at the table so that boys who knew each other would have a friend to sit by (some of the kids were from church and some from school so they didn't all know each other before hand)

10. I found the basic idea for these Lego cakes online from Betty Crocker and thought they turned out great. I'm not a cake decorator by any means so they definitely aren't perfect, but the boys thought they were great!

The time actually flew by and the boys were totally content to just build and play with their Lego creations. I had to pry them away to eat the cake before their parents came to pick them up.

submitted by Emily (www.delightfuldistraction.blogspot.com)

Halloween Carmel Apples


Caramel Apple Recipe

1 pound brown sugar

2 sticks butter, at room temp

1 can (14 oz) sweetened condensed milk

1 cup light corn syrup

1 1/2 tsp. vanilla

1/4 tsp. salt

12 apples

12 dowels


Topping:

1 (12 oz) bag semi-sweet chocolate chips
2 TB shortening

Combine ingredients in a 2-3 quart saucepan. Heat at medium low temp, stirring constantly but slowly and frequently scraping the bottom of the pan. Cook caramel to the soft ball stage (236) degrees. Pour into a small deep metal or heat proof bowl and let cool to 200 degrees. Line a baking sheet with wax paper. Push a dowel or stick into the top of each apple. Dip apples into caramel using a straight up and down motion. (Too much agitation causes the caramel to separate and become oily). Place dipped apples on baking sheet and place in the fridge for 15 - 20 min. Next, dip caramel apples into melted chocolate, then sprinkle with decorative candy.

TIP: Granny Smith and Fuji apples are the best apples to use. Make sure you wash and dry them because there is a waxy film on the apples which will make the caramel not stick.

To make the sticks I cut a 12 inch dowel in half. Then cut out 5 inch by 1.5 inch scrapbook paper. I spread Mod Podge on the back of the paper and rolled it on the stick. It sealed perfectly!!

Submitted by Brandy Dunaway
www.dunawaydivasanddad.blogspot.com

Wednesday, October 22, 2008

Tall Cupcakes


Okay, here it is, the tall cupcake post.  The pan is made by Wilton, along with the cupcake wrappers/papers.  I found both at my local craft store (Michael's).  There are 6 cupcakes to a pan. One cake mix makes one pan.  Then I just use a can of frosting and decorate according to the occasion. 

Friday, October 17, 2008

HELP!

Okay, so a while ago I saw these cute, crafty Halloween door hangers that someone had made to hang on the doors of friends, neighbors, people you visit teach, etc.  I think they were made of cardstock but even had a small pocket to put some candy in, or maybe the candy was just stapled to it.  Anyway, I can't for the life of me remember whose blog I saw them on.  Does anyone know?  I will love ya forever if you do!

Tuesday, October 14, 2008

Crafty Halloween Decor

Witches Boot

1 witches book kit from Wood Connection(includes boot, star, and moon)
20 gauge black wire
2 yards 1/4" ribbon
5 3/16" Zision Eyelets( I used Kiwi/Lime color)
Black, green, purple, orange, yellow, and white acrylic paint
Silver glitter spray

Paint the bottom part of the boot black. Paint 1/2 of the top green and the other 1/2 purple. After it dries paint an orange stripe. Sand the edges and apply a coat of stain(minwax colonial pine). and wipe off. When dry spray with glitter. Using a glue gun, glue eyeletz into "shoelace" holes. When dry, lace up with ribbon. I used a pin with a ball on the end to fish it through. Push wire through the hole in the tip of the boot and on each end of wire attach the star and the moon. I curled it up to make it cute.

Witch hat

Supplies
hat(I used a DCC Crafts paper mache hat 9" high and 12" diameter. However I have had a hard time finding them. I saw a foam at Roberts and Micheals that would be cute to use and it is already black.)
2 yards of 2" or 2 1/2" wired ribbon
1 yard of two other styles of ribbon
20 gauge black wire
decorative spider(tai pan)
1 yard of pom pom fringe(may need more or less depending on size of hat) I use 1/2 inch wide
2 small wood stars(wood connection)
1 small wood moon(wood connection
Black, yellow, purple, and white acrylic paint
Silver glitter spray

Paint the hat black and one star yellow, one star purple, and the moon white. After drying sand the edges of the wood pieces and apply a coat of stain(minwax colonial pine) and wipe it off. Let those dry. Spray the wood pieces and hat with a light coat of glitter.
Dry. Poke 3 small holes in the top of the hat to attach the wood pieces with wire. Wrap the wire around the wood pieces and put into the holes and curl the wire to make it stay. Using a glue gun attach the pom pom fringe to the edges, and use a dot in the back just to hold the wired ribbon in place. Tie a knot with the wired ribbon and before you tie it off just lay the other ribbons in the knot. Tie a bow with just the wired ribbon. Glue the spider on and that was it.

submitted by Mandi  (www.tmlloydfam.blogspot.com)

Monday, September 29, 2008

French Toast Recipe

First, to those who have emailed asking for copies of the Conference packets I will email those out tomorrow.

And second,  your not going to like me unless you live in UT or in the vicinity of Yuma, AZ.  The Overnight French Toast Recipe comes from Kneaders Bakery and Cafe which has locations in the above mentioned places.  You use their Chunky Cinnamon Bread to make it.  And it is "what makes it".  You could try it with a similar type bread from another bakery, but I don't know how it would turn out.  The bread from Kneaders is a dense bread (fluffy wonder bread isn't going to cut it) with cinnamon swirled throughout and then a white icing/glaze on top and also throughout the bread.  

Here is the recipe:

1 Loaf Kneaders Chunky Cinnamon Bread cut into 8 slices
6-7 eggs
2 1/2 cups milk
 1 Tbsp brown sugar
3/4 tsp salt
1 Tbsp vanilla
2 Tbsp butter

Butter a glass 9x13 pan.  Place slices flat in pan.  Mix all remaining ingredients, reserving the butter and pour over the bread.  Cut butter into pieces and dot over the tops.  Refrigerate overnight.  Bake 45-50 min at 350.  

Emily's notes:  First off, I can't fit it all in a 9x13, I end up using a 9x13 plus an 8x8.  Also, I like it best when I refrigerate it overnight and then turn the pieces of bread over and let them sit an hour before you bake it in the morning so both sides really soak up the egg mixture.  It is great with maple syrup or with strawberries and whip cream!

submitted by Emily (delightfuldistraction.blogspot.com) email: delightfuldistraction@gmail.com

Friday, September 26, 2008

Kids General Conference Baskets

*SEE POST DATED 9.29.11 ON THIS BLOG TO GET UP TO DATE CONFERENCE PACKETS AND THE FRENCH TOAST RECIPE.

This is a post from a while back on my personal blog that I thought was appropriate to share since for those who read this and are members of The Church of Jesus Christ of Latter-Day Saints (learn more at www.mormon.org) it's almost time for Conference again. I love General Conference. I look forward to it and so do my kids, and I really love that. I know that the reason it's such an enjoyable and uplifting experience for all of us is that we are prepared. It wasn't always that way, but it is now. Here is a link to some ways to make Conference memorable for your family, we love the "tents" toward the temple idea and use it every time, the kids insist.

Another great help I received last Conference was a booklet of Conference related activities, coloring pages, and games for kids that a friend forwarded to me. I updated it the best I could for this time and plan on using it again. I am not kidding when I tell you that my 4 and 6 year old sat in the family room with us and listened to almost all 8 hours of Conference. (email me if you want a copy at delightfuldistraction@gmail.com, I already sent it to a bunch of you yesterday).

A few Conferences ago I started a little tradition of doing something fun for the families of the women I visit teach to help them enjoy Conference weekend. The first time I made sticky buns for all of them and dropped them off the night before so they could bake them fresh in the morning. Last time I made the baskets pictured above for their kids. They included an activity booklet for each child, pencils and crayons, and some apples and toffee apple dip. This weekend I plan on delivering "Overnight French Toast" with strawberries and whip cream to them on Saturday night. They can put it in their fridge and bake it Sunday morning to enjoy. I have not been a faithful Visiting Teacher lately and need to do better so hopefully this will start me off on the right foot!

TOFFEE DIP FOR APPLES

1 (8oz) cream cheese, softened
3/4 cup brown sugar
1/2 cup granulated sugar
1 tsp vanilla
1 (8oz) bag Heath toffee bits

Mix all ingredients together and serve with sliced apples or refrigerate till ready to serve. Makes about 3 cups.

So, here's my little nudge to you to be prepared so that you really can feast upon the words of Christ. It makes all the difference!

P.S. I'd love to hear any other Conference related activities/ideas your family enjoys.

submitted by Emily (delightfuldistraction.blogspot.com) email: delightfuldistraction@gmail.com

Visiting Teaching Brunch

A few weeks ago I hosted a brunch at my house for the girls I Visit Teach (a program from my church, to learn more visit www.mormon.org). It was so much fun and I think would be a fun "gift idea" to do for any group of gals you love for the holidays. Below I will cut and paste from my personal blog what I did for mine, it was pretty simple since I'm at the end of being pregnant with #4. I've heard of lots of other fun ideas for this and next time I think it would be fun to send out invitations and have something for them to take home (a plant, handmade gift, etc).

What: Brunch (Ham, Mushroom & Spinach Strata, French Breakfast Puffs, Fresh Orange Juice and Fruit Skewers)

When: Last Friday Morning

Where: Emily's House

Who: Emily, Heather, Cassandra, Tina, Kari, and Michelle + the littles that aren't in school yet

Why: Do you really need a why to get together and eat good food with good friends? I don't think so!

submitted by Emily (delightfuldistraction.blogspot.com) email: delightfuldistraction@gmail.com

"BOO" sign


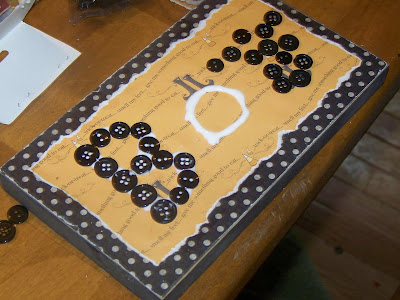
Used scrap wood, painted it black, modge podged the scrapbooking paper on the board, then sand papered, tore additional paper and glued onto the board and added "boo" in buttons with Ribbon at the top to hang

submitted by Mandy

Photo Book Gift


I might be a bit late to post but I wanted to share the gifts that I made for my mom and my mother in law for Mother's day... Photo Books from Shutterfly... they were easy to put together and I watched for a good sale and I'm really happy with how they turned out. I feel like it's a personalized gift and a little different from the gifts they usually receive.

This one is for my Mother in Law... it's her son's (my husband's brother) wedding in Hawaii last summer.

Here is a link to the whole book:

http://community.shutterfly.com/gallery/post/start.sfly?postId=/gallery/1/post/GMGDBg2Zt2DVk0YA6TmZla&v_r=t

submitted by MaryRuth (thefrancks.typepad.com)

We're Back & Nativity Blocks

Hello Everyone!  Sorry I haven't posted in so long.  Being pregnant with #4 has been exhausting!  Anyway, I've had lots of people email hoping for more posts on this blog and just wanted to let you know that I'd love to post more ideas as the holidays are right around the corner.  I also know lots of church groups have Super Saturdays and craft days in the fall and there are plenty of great ideas to be had there as well.  So follow the directions on the sidebar and email your ideas, I'll be happy to post them and we can all enjoy!   I will also try to answer the questions you have emailed me over the past while.

Okay, one really fun item of business to start things off is that a fellow blogger found a site where you can print off the MAMBI clip art that was used to make the Nativity Blocks shared by Hilary last year.  The clip art costs $5 to download and you can find it at pccrafter.com.  The stickers have been discontinued but you can print the clip art on adhesive paper and viola you've got stickers.  So, a big huge thanks to Sanders Family (sorry I don't know your first name) for this awesome find!  

Here is the original post submitted by Hilary:


This is a fun idea for nieces, nephews and even your own kids. I saw this on a message board and asked the girl if I could share.

Paint blocks with a few coats of paint. Then apply the stickers. Ink or sand the edges to distress. Then put a coat of Mod Podge on them to seal in the stickers. Let dry.

This particular set of stickers is by Me & My Big Ideas (MAMBI). They are no longer made, so if you like this set you just have to hope a craft or scrapbook store still carries this line. I've done extensive searches online and they are hard to find! However, there are other brands of Nativity stickers. You could probably even find cute nativity clipart.

Friday, March 28, 2008

Fresh Ideas Needed

Hello all, I apologize for not updating this for so long, life often gets the best of me which is how it should be, right?!

Be sure to check out three fun new ideas submitted by fellow bloggers below.

The holidays/occasions that I'm going to be needing ideas for next (and I assume you, too) are Mother's and Father's Day and then of course teacher gifts for the end of the school year.  So put your thinking caps on, dig out your ideas and SHARE!

Fruit Kabob Centerpiece


Used for my husband's luau themed birthday party

The fruit is on kabobs and pushed into pineapples. The "trees" are carrots with slits on the sides and a green bell pepper on top. Fruit is then filled in on the bottom, it was easy and turned out looking great

submitted by Mandy Hughes

EASTER BUNNY S'MORES


INGREDIENTS AND DIRECTIONS:

1. Reduce 1 sleeve graham crackers to crumbs.
2. Layer 2/3 of the crumbs in a 1 quart jar.
3. Place 8 marshmallow bunny peeps standing up, facing out around the inside of the jar.
4. Press them up against the glass, but don't squash them.
5. Carefully spoon remaining crumbs in the center of the jar to support the bunnies, pressing down to keep it snug.
6. On top of this pour 1-1/4 cup Easter M&M's.
7. Spoon 1/3 cup brown sugar into center of M&M's, gently pressing with a spoon.
My changes: I did M&M's first, then Peeps, then put combined brown sugar and graham cracker crumbs in baggie. I didn't like how the crumbs made a mess in the jar.

Attach a gift tag giving the following instructions:

1. Empty the jar contents into a bowl. Snip the bunnies into bits with kitchen sheers or cut up with a knife. Return the bunny bits to the mixture. Mix well.
2. Melt 1/2 cup butter; add 1 teaspoon vanilla. Pour this over the dry ingredients, mixing well. Pat into a greased 9" square pan. Bake at 350 degrees F for 15 minutes. Cool and cut into bars.
(Makes 9 to 12 bars.)

*Option - leave bunnies whole; combine remaining ingredients and place the bunnies on top; then bake as directed.

*This gift jar may be created to suit any holiday for which marshmallow candies are available.

submitted by Hilary Shirley

Kid Friendly Sushi


Supply list

Rice Krispies
Marshmallows
Butter
Swedish Fish
Fruit roll ups

I made these sushi for my kids to celebrate the Chinese New Year!

1. make rice krispy treats if you don’t have a recipie here is an easy one:
¼ c. butter
10 oz. marshmallows
6 c. Rice Krispies

Melt the butter and marshmallows over low heat on the stove. Pull off heat and add rice krispies. Place in buttered pan.

2. While the Rice Krispies are still warm, butter your hands and take a little ball out. Place a Swedish fish in the middle of the ball and form it into a sushi roll size. Wrap with a fruit roll up. Place on a plate to cool off.

Tips- you need to be able to rebutter your hands a lot so they don’t stick to the rice krispie treats. Also I cut the fruit roll ups in half. You might even want to cut it in thirds, it depends on how big you want your sushi to be. Have fun!


Submitted by Erin Wayland
http://nathananderinwayland.blogspot.com/

Thursday, January 31, 2008

Cute Anytime Gift Idea


Supplies needed:
2 colors of cardstock (Valentine's is coming . . . think pink!)
cellophane
coordinating ribbon
and . . .
Chocolates!

To make these little cuties . . . borrow your friend's scallop cutter to get the cute edge on the smaller circle. (Or you can probably buy that fun cutter at your local craft store.) Then I used the Creative Memories cutting systems circle patterns to cut the larger circles. I used a bit of 2-sided adhesive to stick them together. Finally, I used the CM circle maker to do the smaller circles for the coordinating gift tags, and a corner rounder to finish them off.

I've had my eye on these chocolates for two years now . . . they are from Costco and I think they are so cute! One box was $10.-12. I think, and dividing them up for these gifts had enough for the women I visit teach and for the elderly couples and widows in our cul-de-sac. (And of course a few left over for me to sample.)

These are nice because they are a small but delicious gift for a single person to enjoy.

submitted by
Alisha 

Tuesday, January 29, 2008

Baby Shower Accessory Jar (Girl)


Okay, I have to start out by saying I got this adorable idea from Anna. She along with her sister and mom have a business that makes some of the cutest baby accessories EVER! Check them out at The Pixie Patch.

I'm headed to a baby shower for a friend who is expecting her first girl in a couple of days. I ordered these booties, hair accessories and binky clip from the Pixie Patch, put them in this glass jar that she can use to keep all her little accessories in (got it at WalMart for $2.86, thank you Hilary!), tied a ribbon and attached some tags and viola. It almost makes me want to have a baby!

submitted by Emily (www.delightfuldistraction.blogspot.com)

Valentine Flower Pots


After Christmas, January arrives and in Utah, it's often grey, cloudy and snowy, so we thought (my 6 year old and I) that we'd invite February in a little sooner to add a little cheer. February is full of birthdays in our home and Valentine's Day and who doesn't love the color pink? I don't know how this idea came about except for I wanted something cheery and felt a bit crafty. So while I used some flower pots from Christmas sales (red and black), I also used flower pots painted pink. Use whatever you choose. I was on a quest to have a craft project for my daughter and nieces but it turned into a "Just for Fun" project that I gave to some of my neighbor friends as well. It's just cheery and you could modify it to how you'd like.

Items needed:
1- 6" flower pot (mine were Christmas w/ red and black, or choose red, pink, white, etc.) ($2-$6 depending on pot used)
2- Ribbon-I used a solid red (to cover the black to red seam—not necessary w/ a solid color pot) and a pink/orange/red ribbon (used over the solid red and tied in a knot at the front of the pot) ($3 at JoAnn's)
3- Floral foam
4- Bunch of gerbera daisies (6 per pot) ($1-$2 dollars a bunch for 6)
5- Fountain grass (mine were from the $1 Store)
6- White paint (for polka dots)
7- Sparkly hearts on sticks ($1 Store)
8- Sparkly heart chip boards (4.99 on sale for 2.79 at Roberts)
9- Wire for beads ($2 at JoAnn's)
10- Beads (red, pink, orange to coordinate w/ ribbon, larger aurora/clear beads-.59 at Robert's)
11- Small rhinestone crystals (I got mine at JoAnn's fabrics for about $3 or at Robert's Crafts)

Very easy project (my 6 year old helped while I did the hot glue gun) but fun and cheery!
1. First I painted white polka dots on the top 1" of the pot and let those dry. (I used the Spouncers – foam circle shapes- found at Walmart.
2. I then hot glued the solid red ribbon (optional if you have a color seam and want it to be hidden under chiffon ribbon) overlapping about ¼ inch of the black to the red w/ the seam of the ribbon at the back of the pot.
3. I then put the striped wire chiffon ribbon at the seam of the red in the back of the pot, hot glued it in a few spots so it would stay in place, and tied it in a knot at the front center of the pot.
4. Next we hot glued rhinestones randomly near the white paint polka dots and overlapping the ribbon.
5. We put foam in the pot and put the green fountain grass in the center so it cascades up and out.
6. I then put the gerbera daisies in starting with one in the front center, alternating colors to the sides and worked my way to the back (6 total). I put them low so they rested on the pot and covered the foam.
7. I put 3 glittery hearts on stakes in the center of the fountain grass alternating in heights. I was going to make them but saw these at the $1 Store and they were perfect.
8. I strung beads on wire and randomly curled the wire around the paint brush stick (pencil width) adding beads as I went. Four total pairs (sequence: small colored bead, larger ¼" size aurora crystal, then same tiny colored bead). I put the wire through the knot of the ribbon and back down so the wire hung with the beads. At the end of the wire, I wrapped it around a glittery, heart chipboard (found at Robert's Crafts) and ended with a crystal bead. I also glued a heart on the pot above the knot in the ribbon.
9. For my neighbors, I put a tag inside that coordinated and said "Just for Fun".
10. Final flower pot stands about 15 inches high.

I spent about $6-8 per flower pot but these could easily be made smaller (less $) for VT's or friends.

**submitted by Nikki Norris -- ( nicole.norris@gmail.com)

Thursday, January 10, 2008

Happy New Year & Thank YOU!

Hello All,

First, I wanted to thank all of you for sharing your wonderful ideas on this blog. You are all so creative and I love all the inspiration I find here. Because I have enjoyed this site so much during the winter holidays I really don't want it to end. What do ya say we keep this blog going and open it up to any holiday or gift ideas, such as, birthdays, valentines, anniversaries, baby shower gifts, bridal shower gifts, visiting teaching gifts, etc. We could also include any fun holiday related traditions such as green pancakes on St. Patrick's Day, etc.

Let me know what you think.

Emily